FieldValue
PackageCometChatUIKitSwift
FrameworkUIKit / SwiftUI
ComponentsCometChatConversations, CometChatCallLogs, CometChatUsers, CometChatGroups, CometChatMessageHeader, CometChatMessageList, CometChatMessageComposer
LayoutUITabBarController with Chats, Calls, Users, Groups tabs
PrerequisiteComplete iOS Integration Steps 1–4 first
PatternFull-featured messaging app with multiple sections
This guide builds a tabbed messaging UI — Chats, Calls, Users, and Groups tabs using UITabBarController. Good for full-featured apps that need more than just conversations. This assumes you’ve already completed iOS Integration (project created, UI Kit installed, init + login working, permissions configured).

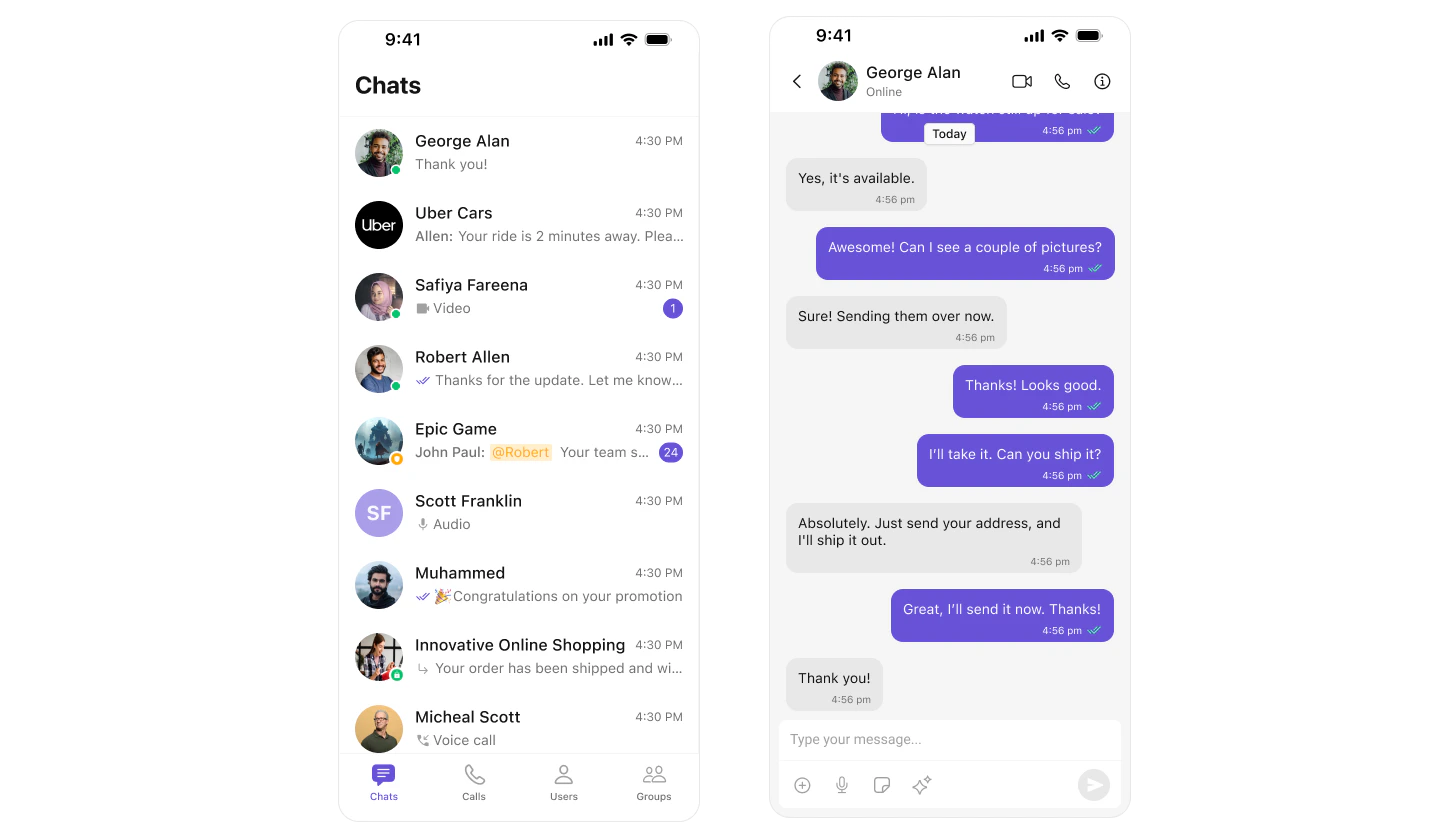
What You’re Building

Four tabs working together:
  1. Chats — conversation list with push navigation to messages
  2. Calls — call logs history
  3. Users — list of available users
  4. Groups — list of available groups

Step 1 — Setup SceneDelegate

Initialize CometChat and launch the tabbed view after login.
SceneDelegate.swift
import UIKit
import CometChatUIKitSwift
import CometChatSDK

func scene(_ scene: UIScene, willConnectTo session: UISceneSession, options connectionOptions: UIScene.ConnectionOptions) {
    guard let windowScene = (scene as? UIWindowScene) else { return }

    let uikitSettings = UIKitSettings()
        .set(appID: "APP_ID")        // Replace with your App ID
        .set(region: "REGION")       // Replace with your Region
        .set(authKey: "AUTH_KEY")    // Replace with your Auth Key (dev only)
        .subscribePresenceForAllUsers()
        .build()

    CometChatUIKit.init(uiKitSettings: uikitSettings) { result in
        switch result {
        case .success:
            CometChatUIKit.login(uid: "cometchat-uid-1") { loginResult in
                switch loginResult {
                case .success:
                    DispatchQueue.main.async {
                        self.setupTabbedView(windowScene: windowScene)
                    }
                default:
                    break
                }
            }
        default:
            break
        }
    }
}

Step 2 — Setup Tab Bar

Create the UITabBarController with all four tabs. Each tab has its own navigation controller.
SceneDelegate.swift
func setupTabbedView(windowScene: UIWindowScene) {
    let tabBarController = UITabBarController()
    tabBarController.tabBar.backgroundColor = .white
    
    // MARK: - Conversations Tab
    let conversationsVC = CometChatConversations()
    let conversationsNav = UINavigationController(rootViewController: conversationsVC)
    conversationsVC.tabBarItem = UITabBarItem(
        title: "CHATS",
        image: UIImage(systemName: "message.fill"),
        tag: 0
    )
    
    conversationsVC.set(onItemClick: { [weak conversationsNav] conversation, indexPath in
        let messagesVC = MessagesVC()
        messagesVC.group = conversation.conversationWith as? Group
        messagesVC.user = conversation.conversationWith as? User
        messagesVC.hidesBottomBarWhenPushed = true
        conversationsNav?.pushViewController(messagesVC, animated: true)
    })
    
    // MARK: - Call Logs Tab
    let callLogsVC = CometChatCallLogs()
    let callLogsNav = UINavigationController(rootViewController: callLogsVC)
    callLogsVC.tabBarItem = UITabBarItem(
        title: "CALLS",
        image: UIImage(systemName: "phone.fill"),
        tag: 1
    )
    
    // MARK: - Users Tab
    let usersVC = CometChatUsers()
    let usersNav = UINavigationController(rootViewController: usersVC)
    usersVC.tabBarItem = UITabBarItem(
        title: "USERS",
        image: UIImage(systemName: "person.2.fill"),
        tag: 2
    )
    
    // MARK: - Groups Tab
    let groupsVC = CometChatGroups()
    let groupsNav = UINavigationController(rootViewController: groupsVC)
    groupsVC.tabBarItem = UITabBarItem(
        title: "GROUPS",
        image: UIImage(systemName: "person.3.fill"),
        tag: 3
    )
    
    tabBarController.viewControllers = [
        conversationsNav,
        callLogsNav,
        usersNav,
        groupsNav
    ]
    
    tabBarController.extendedLayoutIncludesOpaqueBars = true
    
    window = UIWindow(windowScene: windowScene)
    window?.rootViewController = tabBarController
    window?.makeKeyAndVisible()
}
Key points:
  • Each tab wraps its view controller in a UINavigationController for push navigation
  • onItemClick on conversations pushes to the messages view
  • hidesBottomBarWhenPushed = true hides the tab bar when viewing messages
  • SF Symbols are used for tab icons — customize as needed

Step 3 — Create MessagesVC

Create a new Swift file for the messages view controller:
  1. In Xcode, right-click your project folder in the Navigator
  2. Select New File…
  3. Choose Swift File and click Next
  4. Name it MessagesVC.swift and click Create
Add the following code. This view controller assembles the header, message list, and composer.
MessagesVC.swift
import UIKit
import CometChatSDK
import CometChatUIKitSwift

class MessagesVC: UIViewController {
    
    // MARK: - Properties
    var user: User?
    var group: Group?
    
    // MARK: - UI Components
    private lazy var headerView: CometChatMessageHeader = {
        let view = CometChatMessageHeader()
        view.translatesAutoresizingMaskIntoConstraints = false
        if let user = user {
            view.set(user: user)
        } else if let group = group {
            view.set(group: group)
        }
        view.set(controller: self)
        return view
    }()
    
    private lazy var messageListView: CometChatMessageList = {
        let listView = CometChatMessageList()
        listView.translatesAutoresizingMaskIntoConstraints = false
        if let user = user {
            listView.set(user: user)
        } else if let group = group {
            listView.set(group: group)
        }
        listView.set(controller: self)
        return listView
    }()
    
    private lazy var composerView: CometChatMessageComposer = {
        let composer = CometChatMessageComposer()
        composer.translatesAutoresizingMaskIntoConstraints = false
        if let user = user {
            composer.set(user: user)
        } else if let group = group {
            composer.set(group: group)
        }
        composer.set(controller: self)
        return composer
    }()
    
    // MARK: - Lifecycle
    override func viewDidLoad() {
        super.viewDidLoad()
        configureView()
        setupLayout()
    }
    
    override func viewWillDisappear(_ animated: Bool) {
        super.viewWillDisappear(animated)
        navigationController?.setNavigationBarHidden(false, animated: true)
    }
    
    // MARK: - Setup
    private func configureView() {
        view.backgroundColor = .systemBackground
        navigationController?.setNavigationBarHidden(true, animated: false)
    }
    
    private func setupLayout() {
        [headerView, messageListView, composerView].forEach { view.addSubview($0) }
        
        NSLayoutConstraint.activate([
            // Header
            headerView.topAnchor.constraint(equalTo: view.safeAreaLayoutGuide.topAnchor),
            headerView.leadingAnchor.constraint(equalTo: view.leadingAnchor),
            headerView.trailingAnchor.constraint(equalTo: view.trailingAnchor),
            headerView.heightAnchor.constraint(equalToConstant: 50),
            
            // Message list
            messageListView.topAnchor.constraint(equalTo: headerView.bottomAnchor),
            messageListView.leadingAnchor.constraint(equalTo: view.leadingAnchor),
            messageListView.trailingAnchor.constraint(equalTo: view.trailingAnchor),
            messageListView.bottomAnchor.constraint(equalTo: composerView.topAnchor),
            
            // Composer
            composerView.leadingAnchor.constraint(equalTo: view.leadingAnchor),
            composerView.trailingAnchor.constraint(equalTo: view.trailingAnchor),
            composerView.bottomAnchor.constraint(equalTo: view.safeAreaLayoutGuide.bottomAnchor)
        ])
    }
}

Step 4 — Run the Project

Build and run in Xcode. You should see the tab bar at the bottom with Chats, Calls, Users, and Groups. Tap any conversation to push to the messages view.

Next Steps

Theming

Customize colors, fonts, and styles to match your brand

Components Overview

Browse all prebuilt UI components

iOS Integration

Back to the main setup guide

Core Features

Chat features included out of the box